- Tin tức
The Future of Retouching in Real Estate
05/11/2025 | Posted by: Admin
15/06/2021 | Posted by: by Admin
For a professional real estate photographer, every hour spent editing photos is time not spent shooting more jobs, or being with your loved ones! It also means your current clients are still waiting for their photos to be delivered, too.
In other words, the faster (and the better) you can edit and deliver your real estate photos, the happier both you and your clients will be! So, we’ve compiled a list of Lightroom tips just for your profession. These tips will help you work quickly, and also deliver high-quality photos!
Thank you to Photomatix for sponsoring this tutorial series and making it possible. The tips given in this tutorial are based on professional experience by our full-time staff of photographers, and are our own opinions and advice!
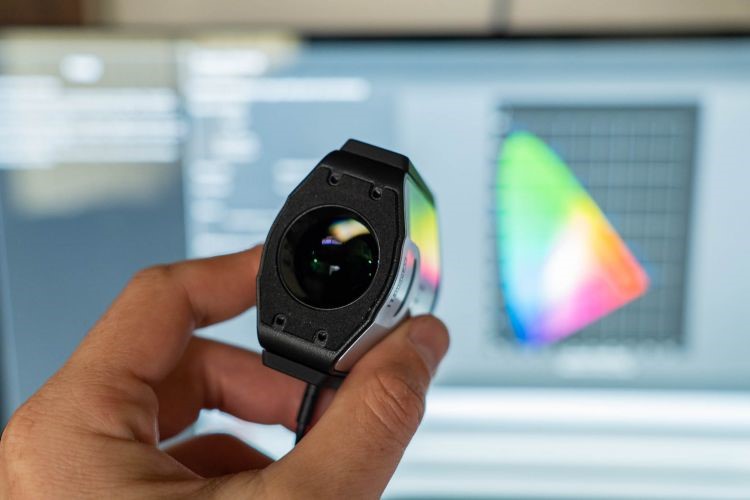
Before we import our photos into Lightroom and start processing, we need to set the foundation for viewing our images correctly. This requires a display that has been calibrated to deliver accurate colors and contrast.
You might think your images look okay, because most monitors do appear decently neutral in terms of color balance, and have great contrast and saturation right out of the box. However, you’d be surprised how much an un-calibrated monitor can deviate from accurate. An image may look correct on your screen, but in reality, the display is making its colors, contrast, or overall brightness appear significantly different from what they’ll look like in print or on other people’s displays.
Your calibration device doesn’t have to be the most expensive one on the market; any of the popular ones will work well. Just make sure the new display profile is still in place when you wake up or restart your computer; in some rare circumstances, the calibration profile can default back to the factory setting.
.jpg)
Okay, it’s time to import all the photos, and separate the keepers from the rejects. Personally, we have some tricks that seem to work well for sorting real estate photos at maximum speed.
First, don’t over-complicate the culling process. But, do utilize whatever culling tools you need to help you work quickly! For example, start with all photos completely un-flagged, and when culling, just hit “P” to flag a photo as a keeper, or a Pick.
If you have any sets of photos that need to be merged to HDR, you could additionally flag them with a red label by hitting “6”. If you have any photos that need advanced retouching in Photoshop, maybe use a yellow label by hitting “7”.
Then, when you’re done flagging all your keepers, just use your filters to select all the un-flagged photos, and mark them as “rejects” all at once by hitting “X”.
.gif)
Next, it’s (almost) time to actually color-correct your photos. First, let’s ask ourselves: what “looks good” for real estate photos in particular? This question is particularly important to anyone who is just starting out and delivering their very first few jobs.
At first, it can be very easy to overdo it with editing. So, always be careful when cranking up the Contrast, Saturation, or Dehaze/Clarity sliders too far! They can be helpful if an image is truly “flat” to begin with, however, most scenes with good contrast and color shouldn’t need too much extra attention besides a little bit of tonal management, and white balance fine-tuning.
Honestly, if you’ve dialed any of these Basic sliders to +20-30 or higher, then try sliding them back halfway. Then, look away from the image for just a few seconds, and look at the it again to see if it still looks good to your eyes. You might actually like the slightly less-edited version! (Or, you might dial certain sliders back up a little bit, of course.)
Everyone has different styles and preferences, and your clients may be expecting a certain look. If you’re already very familiar with Lightroom, and have a lot of experience making images still look good with ample contrast and vibrant colors, then that’s great! This word of caution is aimed more at anyone who is still unsure about whether or not they’ve gone “over the top”. When in doubt, dial it back just a little bit.
As a general rule, many real estate agents and market areas in general will, indeed, prefer images to be processed on the brighter and ever-so-slightly warmer side. Why? Because it makes a home seem very inviting, welcoming, to potential buyers!
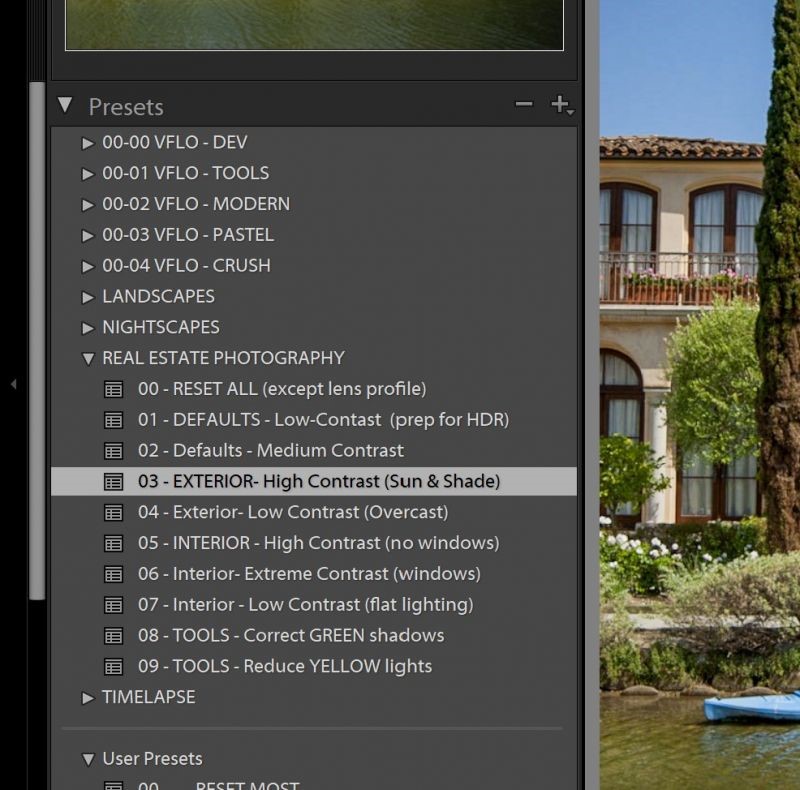
To save time in the color-correction process, real estate is one type of photography that can benefit from presets, in at least a small way. Most real estate photography jobs will involve shooting a bunch of photos from just a few rooms or outside angles. What this means is, a lot of your images will receive nearly identical edits, and eventually you might even begin to encounter similar conditions from job to job.
So, if you frequently find yourself performing a few very similar adjustments, try creating a preset that is the approximate average of those common adjustments. Whether it’s for a type of room, decor, or even a type of lightbulb, any time you find yourself always doing the same adjustments to more than just one or two sliders, try making a preset for those sliders, (Of course, un-check all other boxes for the other settings, so your preset doesn’t mess up anything you don’t want it to!)
You might find that from one job to the next, some presets you created work well, while others need fine-tuning, or some just aren’t useful at all. It’s a learning process!
Also, you can update your Adobe defaults to reflect your own personal preferences for the more technical, under-the-hood settings like sharpening, lens profile corrections, or custom color calibration for your camera, if there is a tint in the shadows or something.
PRO TIP: If you’ve started a preset and you want to fine-tune it, right-click it and select “Update With Current Settings”, then check or un-check whichever boxes of the settings you want that preset to change, and click “update”!
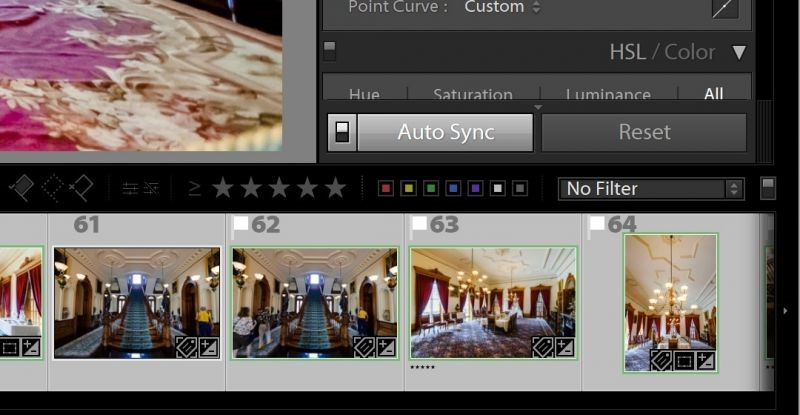
Some photographers don’t like to use presets, and that’s fine! However, one thing you’ll absolutely want to take advantage of is Lightroom’s OTHER tool to help you avoid doing the same edits more than once. That tool is, Auto Sync.
If you’re editing a handful of images from the same angle, or in the same room with the same light, contrast, and overall exposures, then you should get in the habit of selecting all of the photos from that scene and turning on Auto Sync before you start editing.
With Auto Sync on, you can edit the primary selected photo, and Lightroom will match each adjustment for all the other selected photos.
Then, all you have to do is just deselect the additional photos, and briefly go through them one at a time. Hopefully, you will only need to make faint, quick adjustments to the brightness or contrast!
PRO TIP: In case you didn’t notice, you can just hover your mouse over any adjustment slider in the Develop Module, and use the “Up” and “Down” keys to quickly adjust that slider. Shift-click Up/Down for even bigger “bumps” to the sliders!
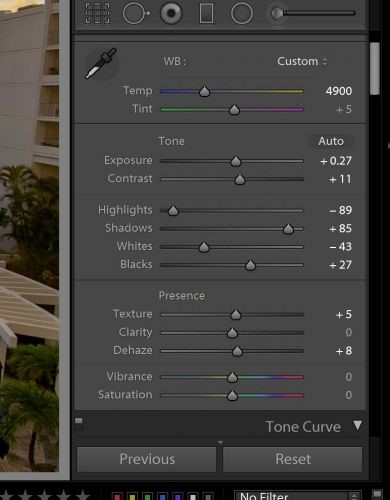
How do you actually edit real estate photos to look good? Let’s get down to the nitty-gritty of how we actually edit the tones in our images. Of course, there are many ways to accomplish basic post-production, but here is our preferred method… (Remember, our general goal for most real estate jobs is natural, brightly processed images, with neutral or slightly warm overall colors.)
1.) Exposure/Contrast
2.) The four other tone sliders (Highlights, Shadows, Whites, Blacks)
3.) The three “Presence” (micro-contrast) sliders
4.) Tone Curves (Point and Parametric)
When editing an image, especially tricky ones with some serious dynamic range, start by dialing your exposure up or down to set the overall starting point for your other adjustments. The goal is to get the image to a place where the rest of your adjustments can be as balanced as possible. This is also the time to make a rough white balance adjustment, if it’s way off.
You can actually leave Contrast alone for now, or, if you do adjust it, remember to come back to it later once you’ve finished managing your major shadow & highlight tones:
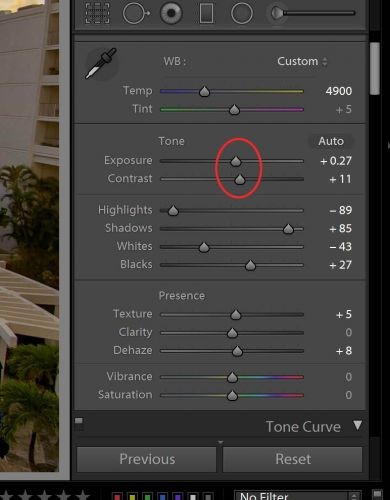
Second, the heavy lifting of “tonal management” is easily done with the Highlights and Shadows sliders of the Basic panel, followed by the Whites and Blacks sliders if you need to fine-tune any tones that are either clipped or almost clipped:
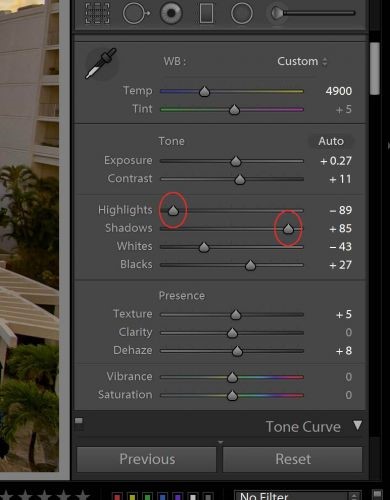
After these adjustments, your image’s overall tones from near-white to near-black should all be falling into place. No totally blown highlight areas, and no large areas of deep, dark shadow:
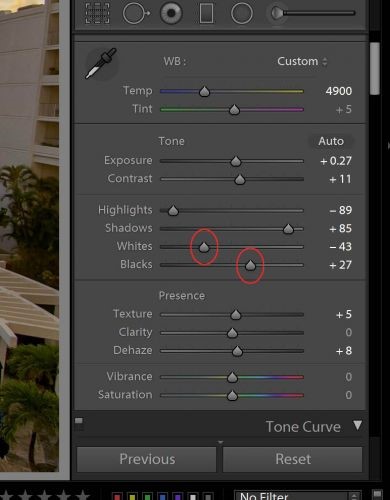
At this point, you can go back to double-check your white balance, and then focus on overall contrast, before we take the next step into more complex contrast adjustments to give your image that final “pop”.
To enhance what is sometimes called “micro-contrast”, the Texture and Clarity sliders affect very small and medium-small detail contrast, respectively. Be careful, though, because raising these sliders too high can add too much “grit” to your images, making clean surfaces look “dirty”, which is never a good thing for real estate:
.jpg)
On a larger scale of contrast, the Dehaze slider can be very dynamic. However, it affects certain tones and colors very differently, so although it may be tempting to go nuts with it on every image, it usually works best on images that actually have some amount of haze or low contrast in them.
Last but not least, for the largest, most powerful contrast adjustments, you have two options: you can go back to the main Contrast slider again, for a very basic, crude adjustment, OR, you can use the Curves panel to adjust contrast in a more precise way, such as only affecting a certain tonal range. (For example, maybe you want to increase contrast in a certain range of shadow tones, and yet leave all other tones alone.)
Point Curve adjustments are usually rather dramatic, while Parametric Curve adjustments are more user-friendly and smooth, but can affect color in weird ways. So, again, use these adjustments lightly, and don’t feel compelled to use every single one of them!
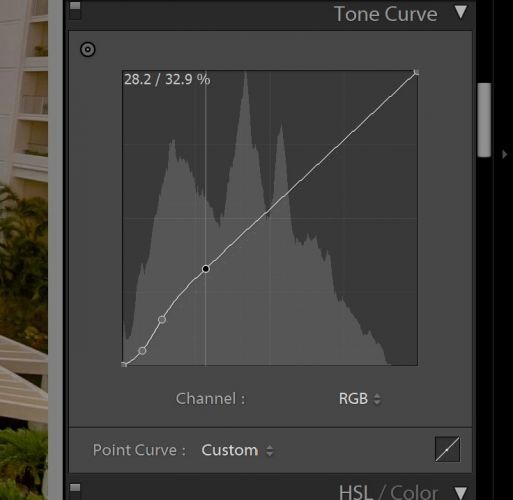
Here’s the thing you should remember as a real estate photographer who needs to get jobs edited and delivered as quickly as possible: Yes, there are 2-4 different ways to accomplish almost the exact same goal, but that doesn’t mean you have to use every single tool on every single photo. Many times, all you need to do is, manage your overall exposure, perform some highlight/shadow recovery, (or create an HDR image for maximum highlight/shadow recovery) …and then finish it off by applying a little bit of contrast without severely clipping anything.
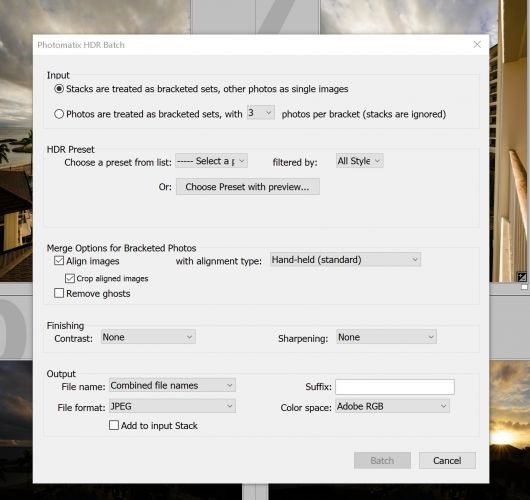
In real estate photography, automating repetitive processes can be a huge time-saver. In fact, on many types of smaller jobs it can make or break your profit margins as a working pro!
For example, oftentimes the best habit is to just bracket exposures for almost an entire job! But then, processing these images should not, indeed cannot, be a “one-at-a-time” type of process, it needs to be automated.
Lightroom now has built-in HDR merging, thankfully, and with one of the most recent updates to (Classic) CC, you can even merge images to HDR (DNG files) in batches. Simply create Stacks of all your bracketed sequences, select all the stacks, right-click one of them, and select “Photo Merge -> HDR”. (Or, hit CTRL/CMD+H)
Lightroom won’t give you any options for how to blend the tones of each image, or ghosting/alignment options, but at least it will merge bracketed exposures together into a single DNG file in one simple step.
If you’d like to have greater control over the HDR merging process, then external HDR merging software such as Photomatix will offer that, even in tandem with batch processing functionality without interrupting your Lightroom workflow.
(NOTE: Thankfully, the days of having to install an external Lightroom plugin separately are mostly over! External editors usually automatically install their necessary Lightroom plugins for you.)
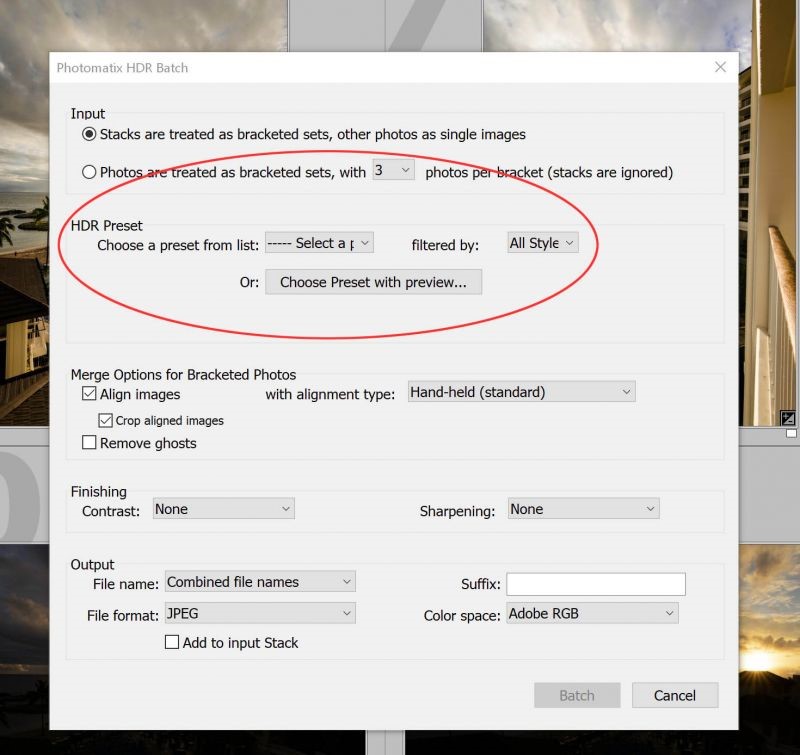
The Photomatix HDR Batch Plugin for Lightroom is a particularly useful plugin for real estate photography. With the HDR Batch Plugin, you can create HDR images in batches, while selecting more in-depth blending methods (fusion, tone balancer, detail enhancer, etc.) or select from specialized real estate presets, make personal adjustments, …and then Photomatix will batch create TIF files that show up in Lightroom.
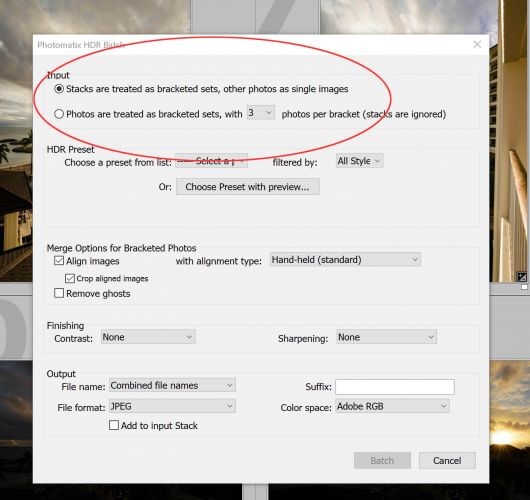
One additional benefit of using an advanced HDR batch processing application is, with Photomatix you don’t need to create Stacks for every single bracketed sequence. If they’re all in sets of the same number of raw original images, you can instruct Photomatix to simply treat sets of 3 (or 5, or however many) images as bracketed sets. Again, saving a few minutes of time can really add up!
Lastly, you can save new presets based on your own preferences, for future jobs that have similar lighting conditions.
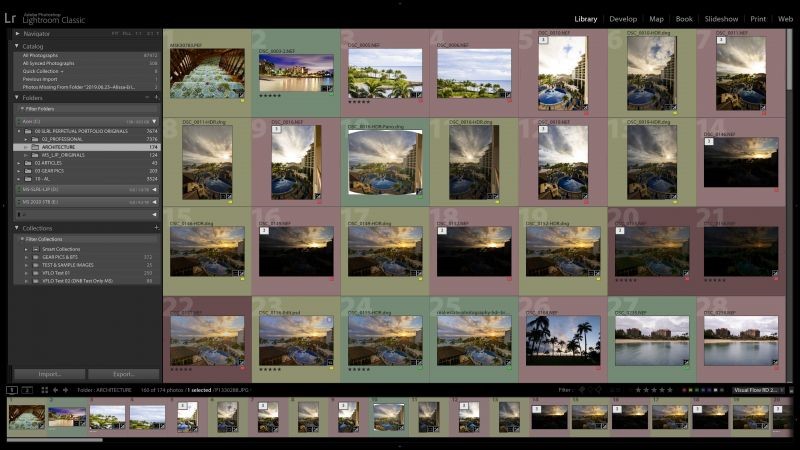
So, you raced through all your images at record speed, and you’re ready to export them and send them off to your client, right? Wait a minute! No, seriously, just wait a minute…
If you’ve been staring at your computer screen for an hour or more, your eyeballs need a bit of what we call a palette cleanser. Get up, take a quick break, go walk your dogs, make a sandwich, do anything besides staring at your screen, for 5-10 minutes. (So, watching TV or checking your phone doesn’t count!)
Then, come back to your computer, and re-check your images in Lightroom’s Grid Mode. It might seem weird, but this is the best way to catch slight mistakes to your images’ overall lightness or white balance! If you’re still getting the hang of color-correction, you’ll often be shocked at how obvious a slight magenta or green tint is, that you totally didn’t see before.
If you look at a whole collection of images as thumbnails, (usually 6-8 images wide, not too small!) it becomes evident when either a single image, or the whole set collectively is off, whether things are slightly too bright/dark, or too warm/cool.
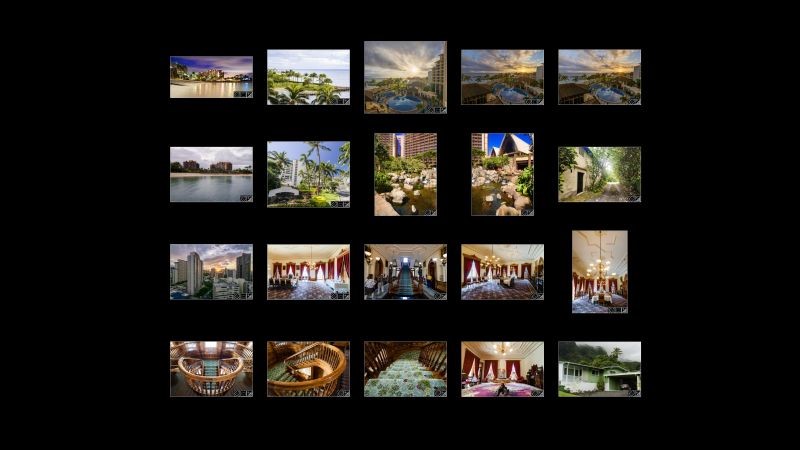
Personally, I take it one step further, and I either undo any color labels I might have used, (because I feel like a green or red label might bias my eyes a little bit when trying to detect any faint Tint or Temp errors) …or, just hit “L” a couple of times until you get the all-black “dim the lights” mode in Lightroom.
Okay, so, your photos are all edited. Maybe even exported and delivered! But, have you ever had a client say, “these photos look great, but I wish they were all a little brighter/warmer”?
Or, maybe you actually used our last tip, and you caught your own mistake before exporting. Good job! Either way, it can be frustrating to need to revisit every single photo…
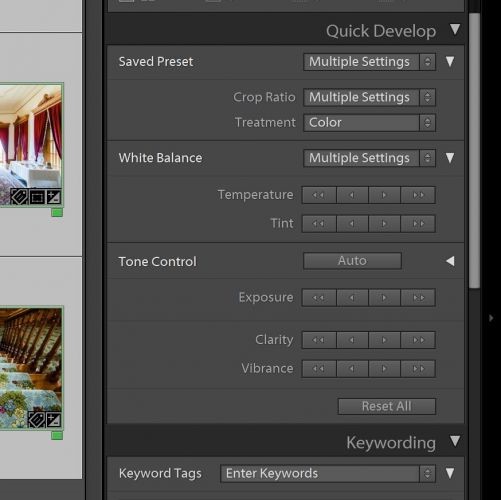
Well, there’s some really good news- you don’t have to go back into the Develop Module and individually correct every single image one at a time! You can use the Library Module instead, and do it all at once. Just select all the photos, turn on Auto-Sync, (visible in the Loupe Mode of the Library Module, but not in Grid Mode) and use the Quick Develop adjustments to “bump” your main image’s exposure, white balance, or contrast… Here’s the cool part: Instead of forcing all your selected images to exactly match the settings of that one image, Quick Develop works differently- it changes each image by the same amount, without totally synchronizing the final position of the slider!
In case you’re wondering, in Quick Develop, the single arrow makes smaller adjustments, (1/3 EV for exposure) and the double arrow makes larger adjustments. (1 whole EV for exposure)
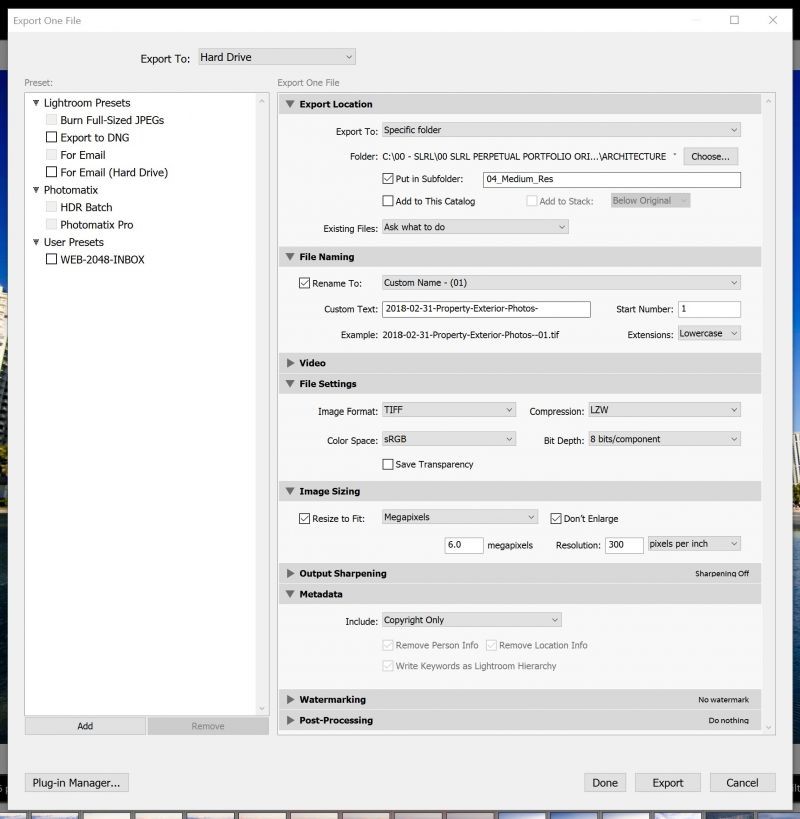
After every keeper image is fully color-corrected and ready to be exported and delivered, there is one last way you can save a bit of time: create export presets for your most common export needs.
For example, we like to deliver images in both high-res and low-res JPG formats, for clients’ convenience. Web-resolution images, by default, are exported at 2048 pixels long for web use, and at around 20 megapixels (5500 pixels long) for print or other high-res use.
Your needs may vary! Some clients might think that 10-megapixel images are “high-res”, and other clients might need your whole 40-60 megapixel files! Of course, it is therefore very important to communicate with your clients about what their final use of the images will be.
If the images are only going to be used in online property listings, you might want to adjust your low-res export resolution to however many pixels they need, whether it is just 1000 pixels on the long end, or 2000 pixels, etc. This way, your client won’t have to worry about uploading 40+ megapixel images just for an online listing! Of course, you can also export a folder of high-res images for the client too, if they want them for their own archival purposes.
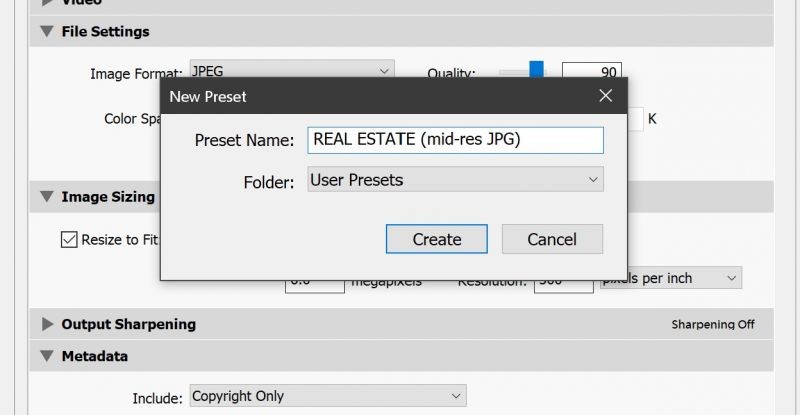
Lastly, if you have repeat clients with different needs, for their own websites or the listing sites they use, then you might create an export preset for just that one client if they want 800-pixel or 1200-pixel wide images specifically.
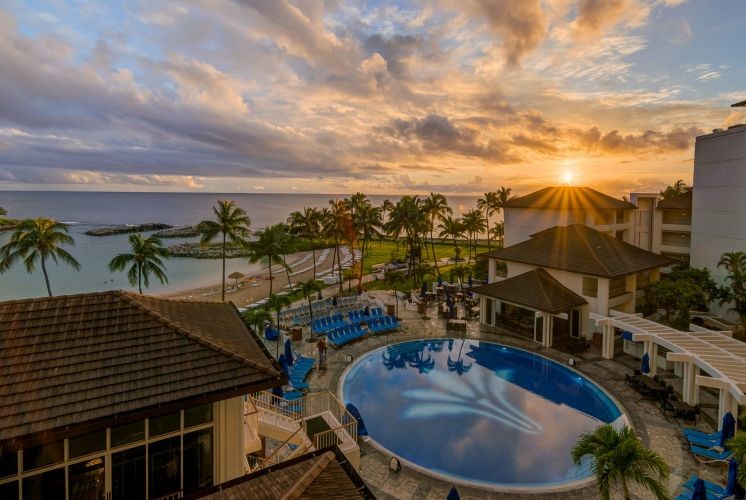
Do you have any other questions about Lightroom and the post-production of real estate photography? Leave a comment below! Hopefully these tips will help get you up and running with an efficient, high-quality Lightroom workflow for your real estate photography.


Welcome back, please login to your account to log in on the website:
Copyright © 2019 Dong Quang. All right reserved
Copyright © 2019 Dong Quang. All right reserved