- Tin tức
The Future of Retouching in Real Estate
05/11/2025 | Posted by: Admin
08/05/2021 | Posted by: by Admin
The post-processing for real estate photography takes a good amount of time for many photographers. This usually takes a huge amount of time as this is an important step in creating amazing images that will help clients in selling their property.
There are different techniques that photographers can use and do in order to retouch and make the properties look great in photos.
Here are some of the basic and most commonly used editing techniques for real estate photography:
.jpg)
Color correction is probably one of the basic and essential steps in real estate photo editing. Color correction can be done on Lightroom and Photoshop. However, it’s easier and quicker to do it on Lightroom. With the eyedropper tool, just click on a neutral area to correct the colors of the entire image. Depending on the photo, you might need to adjust the saturation, hue, and tint in order to get a more realistic image.
.jpg)
When shooting properties, you need to be extra careful with your lines. You need to make sure that these are straight and not bent in some way. Whether you’re shooting interior or exterior, you have to look at the lines and shoot them properly. However, you can always retouch them after a shoot. To align the lines in Photoshop, you can use the Free Transform. Make sure that you select the entire image and drag the corner of the image opposite to where the lines are leaning towards.
.jpg)
When shooting interiors or exteriors, you might encounter problems with the shadows and uneven lighting. To combat this, use Lightroom to adjust shadows, highlight, whites, and blacks. Drag the Shadows bar to the right in order to open up the shadows a little bit. Make sure that it is a safe middle ground. If you have harsh highlights on the photo, you may want to drag your highlights bar to the left in order to bring down the hot spots. To adjust the whites and blacks, hold down the Alt key on your PC or the Option key on your Mac. Bring the whites or the blacks bar to the right until you see specs of white or black on the image.
.png)
Remove unwanted objects in your photo using the clone stamp tool in Photoshop. Click the clone stamp tool and choose the source area. Then, you can start cloning and painting over the object that you want to remove.
On Lightroom, just push the clarity to the right in order to polish the photo. With adjusting the clarity, you might want to adjust the blacks as well in order to add depth and crisper look to the image.
High dynamic range (HDR) is a technique that many real estate photographers use to create a greater dynamic range of luminosity. To create HDR images, make sure that you have shot your subject in different bracketed images. Then, all you have to do is merge the photos into one to show its highlights and shadows.

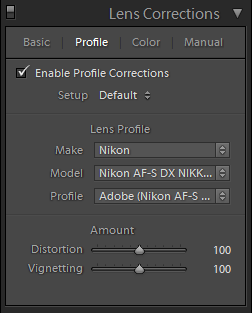
This is a handy tool that you can use in Lightroom. It corrects the optical issues found in most lenses. To use this, just go to the Lens Correction module and click Enable Profile Corrections. Then, click on Remove Color Aberration.

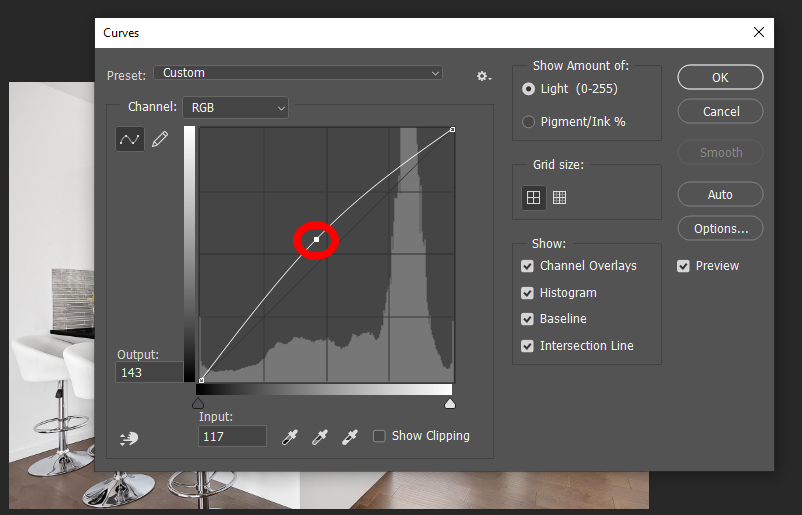
The Curves is a powerful tool in Photoshop. This can be used for color correcting and optimizing your colors. However, it can be an extensive tool that can be challenging to master. To use Curves, go to the Image menu, choose Adjustments and click on Curves. Click Auto in the dialog box. Drag the diagonal line at the center and pull it up to brighten the image or down to darken it. When you’re already happy with the outcome, click OK. You can freely play around with this tool and experiment in order to achieve the look that you want.
The image processor allows you to resize your photos in batches. This is a time-saving tool, especially if you are working on hundreds of images that will have to be used in different mediums. To use the image processor tool, select File menu and click on Image Processor. Choose Folder in the dialog box and save in the same location. Choose JPEG as file type and click on Resize to fit and put in your desired dimensions. Make sure that you include the ICC profile and click Run.
.jpg)
Hue and Saturation is another helpful tool in Photoshop. This can be used for color correction and is also similar to Curves. However, Hue and Saturation can be used to enhance the greens on exterior and landscape photos. To use Hue and Saturation, go to Image menu, choose Adjustments, and click on Hue and Saturation. Choose Yellow from the dialog box. Increase the hue and decrease the saturation and lightness. Change the option from Yellow to Green and repeat the changes you’ve made to hue, saturation, and lightness. Then, click OK.
Composite is an ingenious technique that merges different photos to create a seamless image. This can be used in real estate when you’re blending together different images, such as stitching flash and ambient shots into a single photo. This is often done on instances wherein the subject is manually lit by the photographer using a handheld flash.
If you’re working on similar edits on a number of photos, it’s best to batch edit them using Lightroom. This allows you to save time and do the minor edits all in one go. Just do the retouches and adjustments on one photo and sync these changes into the rest of the images.
The final yet most important photo editing technique when retouching real estate photos is to keep it natural. It can be too easy to go overboard when editing photos. However, you need to make sure that you create a more natural look in order to make the photos believable. The goal in real estate photography is to sell the property. Make sure that you err on the natural side every time you retouch your images.


Welcome back, please login to your account to log in on the website:
Copyright © 2019 Dong Quang. All right reserved
Copyright © 2019 Dong Quang. All right reserved